本机系统:Ubuntu18.04
本机显卡型号查询
1 | lspci | grep -i nvidia |
查看该显卡是否支持cuda
https://developer.nvidia.com/cuda-gpus
更新NVIDIA驱动
添加 Graphic Drivers PPA
1 | sudo add-apt-repository ppa:xorg-edgers/ppa |
1 | ubuntu-drivers devices |
or
打开 Software & Updates,选择 Additional Drivers,一般需要加载一定时间,会出现多个驱动,选择最新的也就是版本号最大的 NVIDIA-Driver,点击应用,需要等待一点时间生成应用,完成便成功安装了驱动

查看NVIDIA驱动版本
1 | nvidia-smi |
or
1 | sudo dpkg --list | grep nvidia-* |
or
1 | cat /proc/driver/nvidia/version |
CUDA与cuDNN
只是深度学习环境,装了conda就没必要单独装cuda什么的了,虚拟环境有指令可以包含进去。
但是CUDA的其他文件可能没有, 比如nvcc.因此我想安装完整的CUDA,。另外, 如果驱动满足, 这里的cudatoolkit版本<=系统, 也能正常使用.
完整的CUDA安装
CUDA Toolkit Archive (Ubuntu18.04 下载runfile版本)
cuda10.1(选择这个版本的原因,是因为cudnn在2020.5.26都没有对应的版本)
1 | wget http://developer.download.nvidia.cn/compute/cuda/10.1/Prod/local_installers/cuda_10.00_linux.run |
安装完后,在.bashrc文件末尾添加环境变量
1 | sudo gedit ~/.bashrc |
测试
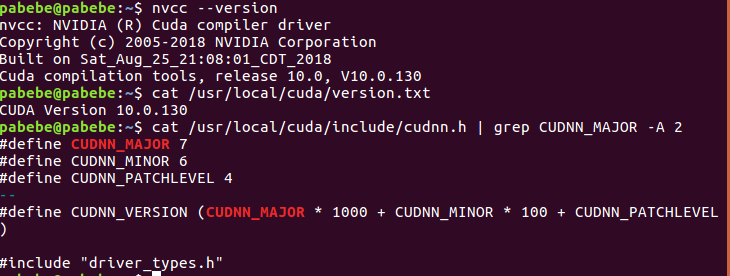
1 | nvcc --version |
https://share.weiyun.com/zMGMSFEE
## cuDNN
cuDNN是用于神经网络的GPU库, 有些python包依赖cuDNN才能运行. 官网说明
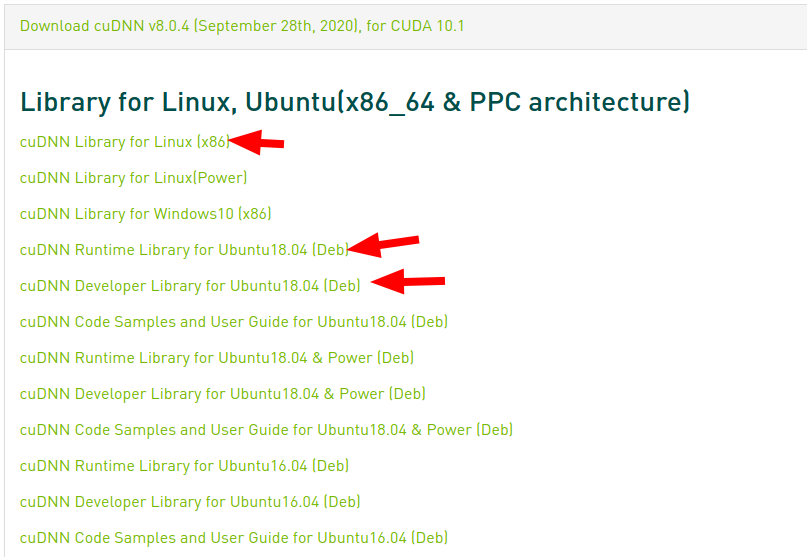
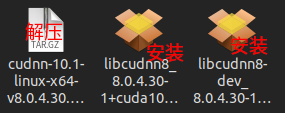
官网cuDNN Archive下载如图文件,依次安装。
1 | sudo cp cuda/include/cudnn.h /usr/local/cuda-版本/include |
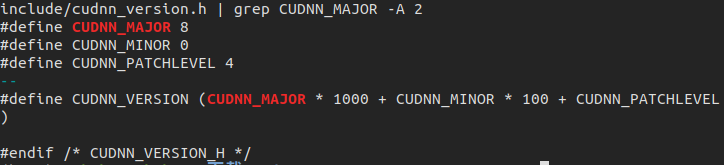
- 安装后查看版本:
1 | cat /usr/include/cudnn.h | grep CUDNN_MAJOR -A 2 |
- (可选)用sample验证CUDNN(需要安装dev和doc两个deb)
修改cudnn.h的include “…”为include <…>,否则下面编译会报错
1 | cd /usr/src/cudnn_samples_v7/mnistCUDNN # 如果没有操作权限就cp到可操作的位置 |
删除旧版cuda10.1 与 cudann8.0.4
1 | cd /usr/local/cuda/bin |
因为GPU为3090,所以需要升级cuda
1 | sudo apt-get remove cuda |
1 | cd /usr/local/ |
安装新版cuda11.1+cudnn8.0.5
1 | sudo wget https://developer.download.nvidia.com/compute/cuda/11.1/local_installers/cuda_11.05_linux.run |
修改对应环境变量.
官网cuDNN Archive下载cudnn8.0.4 cuDNN Library for Linux (x86_64)
然后j解压,复制文件:
1 | sudo cp cuda/include/cudnn.h /usr/local/cuda-11.1/include |
验证安装结果:
1 | cat /usr/local/cuda/include/cudnn_version.h | grep CUDNN_MAJOR -A 2 |
安装Miniconda
点击Anaconda 镜像使用帮助,下载Miniconda (Miniconda3-py37_4.8.2-Linux-x86_64.sh)就可以了。
1 | # 进入下载目录 |
完成后关闭该终端,再一次打开终端
测试是否安装成功
1 | conda --version |
conda常用命令
pytorchGPU为所创建的虚拟环境名字
创建虚拟环境
1 | conda create -n pytorchGPU python=3.7.6 |
激活虚拟环境
1 | conda activate pytorchGPU |
退出当前虚拟环境
1 | conda deactivate |
删除虚拟环境操作
1 | conda remove -n pytorchGPU --all |
1 | conda info #查看conda的信息(是否有镜像库) |
对虚拟环境中安装额外的包
使用命令conda install -n your_env_name [package]即可安装package到your_env_name中
删除环境中的某个包
使用命令conda remove --name your_env_name package_name 即可
配置深度学习环境
Anaconda Cloud官网提供了各种包的安装命令,可以搜索并安装到我们创建的虚拟环境中,例如搜索pytorch,执行便可安装
再一次检查镜像源:
1 | sudo gedit ~/.condarc |
配置文件修改如下:
channels:
  - https://mirrors.tuna.tsinghua.edu.cn/anaconda/cloud/pytorch/
  - https://mirrors.tuna.tsinghua.edu.cn/anaconda/cloud/conda-forge/
  - https://mirrors.tuna.tsinghua.edu.cn/anaconda/pkgs/main/
  - https://mirrors.tuna.tsinghua.edu.cn/anaconda/pkgs/free/
  - https://mirrors.tuna.tsinghua.edu.cn/anaconda/pkgs/r/
  - https://mirrors.tuna.tsinghua.edu.cn/anaconda/pkgs/pro/
  - https://mirrors.tuna.tsinghua.edu.cn/anaconda/pkgs/msys2/
  - https://mirrors.tuna.tsinghua.edu.cn/anaconda/cloud/msys2/
  - https://mirrors.tuna.tsinghua.edu.cn/anaconda/cloud/bioconda/
  - https://mirrors.tuna.tsinghua.edu.cn/anaconda/cloud/menpo/
  - https://mirrors.tuna.tsinghua.edu.cn/anaconda/cloud/simpleitk/
  - defaults
show_channel_urls: true
1 | conda info #查看conda的信息(是否有镜像库) |
安装GPU版pytorch,在官网http://pytorch.org/选一个你的当前的配置
1 | conda create -n pytorchGPU python=3.7.6 |
测试
1 | #在VScode里面测试 |
## 出现错误
Torch not compiled with CUDA enabled
不知道是什么原因,清华源下载的是cpu版pytorch
我认为是没有检测到安装好的英伟达驱动程序,所以检查好驱动版本后重启电脑,重新安装pytorch(删掉这个虚拟环境,再来)。
IDE-VScode
推荐Visual Studio Code,轻量快速,在终端激活环境,便可直接运行程序
##安装
1.进入官网,直接下载压缩包。(我的是64位)
https://code.visualstudio.com/Download
1 | cd 下载 |
解压完成,在全部应用的区域就可以看到VS Code的图标了,直接点击打开
配置
ubuntu18.04- +vscode c++使用时的三个配置文件
pylint路径设置
VSCode中pytorch出现’torch’ has no member ‘xxx’的错误
setting中python.linting.pylintPath : /home/用户名/miniconda3/pkgs/pylint-2.5.3-py37hc8dfbb8_0/bin/pylint
保存后便无报错。
注意:该方法必须是用conda安装pylint,而不是pip安装的。可以通过pip uninstall pylint 卸载,再conda重装pylint
美化
下载字体
到FiraCode字体的GitHub页面
找到下面的Download链接下载最新字体
解压缩下载文件,并进入ttf文件夹
选中所有字体文件,右键选择安装
配置字体
打开vscode的配置页面,并搜索font
修改editor.fontFamily配置项的内容为:'Fira Code Retina', 'Microsoft Yahei UI'。由于Fira Code字体不支持中文,这里配置微软雅黑为第二字体
配置后重启vscode
vscode对于交互式ipynb文件的问题:Interactive window with Matplotlib and notebook option
IDE-PyCharm
1 | sudo snap install [pycharm-professional|pycharm-community] --classic |
最好利用edu邮箱申请专业版,功能多且免费,Community Edition不包括Jupyter笔记本集成。
在学生授权有效期间可以下载安装任何 JetBrains Toolbox 下任何新版本开发工具,并使用 JetBrains 帐号激活。理论上只要邮箱不回收,就可以一直用。每次申请都是一年,一年后继续申请就好了
优化
代码模板
PyCharm –> 选择File –> Settings –> Editor –> Code Style –> File and Code Templates –> Python Script
1 | #!/usr/bin/env python |
连接github
配置路径
File | Settings | Version Control | GitHub 配置github账号密码
git ubuntu默认配置好了,window自己配置git路径。
推送项目至版本库/github
VCS–>Import into Version Control–>Share Project on GitHub/create git repository
克隆项目
VCS -> Get from Version Control -> Git
.gitignore
### 生成requirements.txt
(1)会将环境中的依赖包全都加入,如果使用的全局环境,则下载的所有包都会在里面,不管是不时当前项目依赖的,如下图
1 | pip freeze > requirements.txt |
(2)推荐,只加入项目所依赖的包
1 | # 安装 |
--encoding=utf8 为使用utf8编码,不然可能会报UnicodeDecodeError: ‘gbk’ codec can’t decode byte 0xae in position 406: illegal multibyte sequence 的错误。
--force 强制执行,当 生成目录下的requirements.txt存在时覆盖。
使用 requirements.txt
1 | pip install -r requirements.txt |
pytorch 网络结构可视化
pytorch 的模型结构可视化方法:
(1)使用 tensorboardX(不太直观)
(2)使用 graphviz 加上 torchviz (依赖于 graphviz 和 GitHub 第三方库 torchviz,线条比较死板)
(3)使用微软的 tensorwatch (TensorWatch 是一个调试和可视化工具,专为 Microsoft Research 的数据科学,深度学习和强化学习而设计。只能在 jupyter notebook 中使用,图片比较美观,但有时候会出现一些莫名的错误)
(4)使用 netron 可视化工具(.pt 或者是 .pth 文件,对pytorch模型的支持不友好)
## 使用第二种
1 | pip install torchviz |
使用demo
1 |
使用第三种
1 | pip install tensorwatch |
使用demo
1 |
LINUX下查看点云图
Ubuntu18版本缺失?
LINUX下查看点云图————point cloud(.ply .vtk .pcd)
所以还是安装cloudcompare
1 | 科学上网,这条命令自动安装latest stable版本 |
Bolg
参考链接
Ubuntu 搭建深度学习环境(直接安装anaconda,就不需要再繁琐安装cuda、cudann了)
conda安装Pytorch下载过慢解决办法(11月26日更新ubuntu下pytorch1.3安装方法)
Ubuntu 18.10 下安装CUDA10/CUDA10.1
PyCharm设置代码模板:自动生成文件名、作者、创建日期等信息
Pytorch神经网络结构图可视化(Ubuntu+torchviz+graphviz)
Pytorch神经网络结构可视化模块–Tensorwatch